Usually, owners of smartphones and tablets are more interested in the possibility of getting, rather than removing, a root. Full control over the gadget gives its owner many undeniable advantages. But this is not always the case. Keeping in mind the complexities of obtaining, the user begins to wonder how to remove root-rights from Android so as not to add new problems.

- When to remove root rights
- If you remove root-rights
- How to do it
- Using a PC without apps
- Flashing
- In fact Android
- With Universal Unroot
- Using SuperSU
- With ES Explorer
- Removing root traces on Android
- How to Remove Superuser Rights on Samsung Galaxy
- Detailed instructions
- Problems after removing root
- How to remove Root rights with one click: Video
When to remove root rights
Even successful rooting sometimes does not stop the smartphone owner from urgently performing the reverse procedure. As a rule, the complete removal of root-rights to Android is motivated by:
- The need for warranty repair. The service center does not recognize the warranty, and the rooted device will not take into operation.
- The desire to sell the device. Any intervention is unlikely to increase the value of the device in the eyes of the buyer. It is difficult to consider such a device even as a gift, especially if it is intended for an inexperienced user.
- Unsatisfactory operation of the device. There have been cases where, instead of improving performance, root had the opposite and even negative effect. Experts knowingly warn about the possible 'dire' consequences. In some cases, the gadget can only be saved by completely removing root access with a flashing to the stock version.
- The risk of catching a virus that can use root access and become an Administrator, which will create insurmountable obstacles to the normal functioning of the device.
Removing root permissions on Android is still necessary due to the inability to receive updates 'over the air'. The function is blocked by the modified system, since root disappears when the OS is updated.
Aside from warranty repairs and poor device performance, all other incentives to abandon root can be considered secondary.
to the content
If you remove root-rights
So, the decision has been made, but there are doubts. Users cannot but be interested in the future of their gadgets, so the question of what will happen if you remove root rights from Android becomes relevant for them.
If everything is done correctly, nothing bad will happen to the device. Worse than before rooting, the device is unlikely to become. Of course, if, when removing root, it does not 'grab' some of the system files.
to the content
How to do it
The operation to remove root is a priori no more difficult than getting it. Experts recommend using the same method that was used to obtain the rights. So, you can remove root rights using:
- Additional software installed on the gadget or a PC connected to it. By the way, removing root-rights from Android through a computer can be much better.
- Flashing. This option always gives one hundred percent result, but it does not do without data backup (backup).
- Manually. The method is working, but it requires attention and time.
- Complete factory reset. It also requires pre-saving user data.
to the content
Using a PC without apps
This method assumes only two options available:
- Program.
- Re-flashing.
If the root was obtained using programs Windows, then removing root-rights from Android without the program will work. For example, in Kingo Root, this is very easy. Need to:
- Connect the powered device to the computer.
- Open the program. The root status appears and a prompt to delete.
- Confirm the request by selecting the appropriate button.
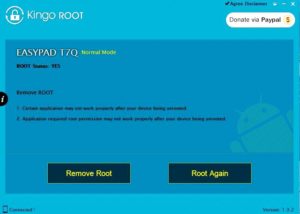
In other cases, the issue is radically resolved by flashing.
to the content
Flashing
This method allows you to quickly and completely remove root-rights to Android. The new OS will be installed on the device, and all user information and applications, including superuser privileges, will be removed.
It is important to take into account that each device has its own programs that allow you to painlessly carry out this operation. Therefore, it is recommended to use the original software from the official sites.
to the content
In fact Android
You can remove root-rights from Android without a PC:
- Reset settings.
- Programmatically.
- Manually.
With the Recovery mode, you can revive your smartphone. It is used for hard rebooting, formatting external memory card partitions and flashing Android. To refuse root, you must:
- Turn off the device.
- Enter Recovery by performing certain combinations with the volume and power buttons (they are different for different devices).
- In the window that appears, select Factory reset (return to factory settings).
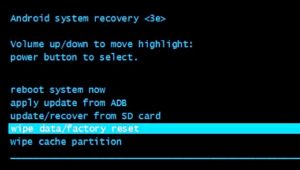
It should be noted that this method does not guarantee the final removal of root. On some models, superuser rights are restored after a reboot. In such cases, the Root Checker utility helps to understand whether the rights have been removed.
to the content
With Universal Unroot
The program is paid (costs about $ 1), but it is very easy to get rid of root on Android. And for this you need:
- Download and install Universal Unroot. The utility is available on Google Play.
- Run the program and select the 'Unroot' button.
- Confirm irrecoverable deletion by clicking on 'Yes'.
- Grant superuser rights for the last time and wait.
After rebooting, root will disappear.
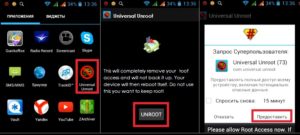
Important: the developer warns that the program is not suitable for all devices.
to the content
Using SuperSU
You can close root-rights on Android using the SuperSU program, if it is a root source and is installed on the device. To do this, you should:
- Run the utility.
- Enter the 'Settings' section.
- Select 'Full Unroot' and press the 'Continue' button.

- Wait until the end of uninstallation.

- When the app closes, restart your device.
This option works if the gadget does not use third-party firmware. If a custom device is installed on the device, after a reboot, root access can be restored.
to the content
With ES Explorer
You can manually remove root rights from Android via ES Explorer. The method involves searching for and removing specific files from the system. This requires:
- Grant the file manager superuser rights.
- Find and open the / system / app folder in the device's memory.
- Find the .apk file of the super.su application and select 'Delete' from the context menu.

- Delete the file of the same name with the .odex extension, if present. In Android 5.0 and higher, embedded applications are located in separate folders, which must also be selected and removed.

- Application updates may remain in / data / app, which should also be erased.
 In Android 5.0, application updates are located in separate folders. You need to select and delete the required ones.

- Clear the cache of built-in applications located in the / data / data folder.

All preinstalled applications should be removed, but it is not recommended to touch the system applications (with the icon Android), otherwise problems may occur.
to the content
Removing root traces on Android
You can remove traces of root-rights to Android only by the method / application with which they were obtained. As noted above, even a hard reset does not always solve the problem. It is very difficult to do it manually, only the new firmware removes the issue.
to the content
How to Remove Superuser Rights on Samsung Galaxy
The gadgets of this series are equipped with a special counter that tracks system changes and hacks. In order not to reset it, a flashing is used. Let's make a reservation right away that there will be no reset if root was obtained recently, using modern methods. To rollback from the root, the Odin program is used, which was created exclusively for solving the problem on Samsung models.
to the content
Detailed instructions
To disable superuser mode on Android Samsung Galaxy model line, you must:
- Download and install Odin software on your computer. You can find the utility in the public domain on the forums.
- Download a file with official firmware for a specific gadget model to your PC from the Samsung Updates site. The build number can be found in the gadget settings in the 'About device' section.
- Extract the contents of the archive with the firmware into the Odin program.
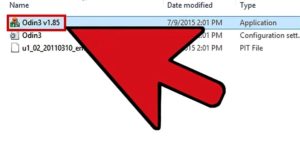
- Launch Odin and connect your device to your PC. In this case, the corresponding COM information should appear in the ID field. There should be a green square next to the box if the Samsung drivers were successfully installed.
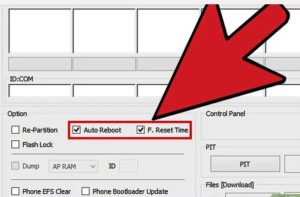
- Uncheck the box next to Repartition and check next to Auto Reboot and F. Reset Time.
- Turn off Android and enter Recovery mode. To do this, press and hold the volume down, power and Home buttons at the same time.
- Specify the path to the firmware file in the AP field (extension can be .tar, .tar.md5 or .bin) and press the 'Start' button.
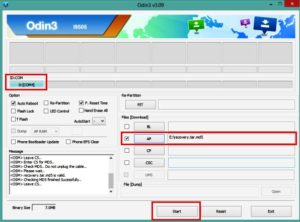
The process will take some time (up to 10 minutes), and then the program will inform you about the successful completion of the operation.
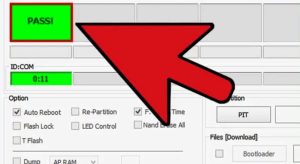
The gadget will reboot normally. Root will be completely removed, and the smartphone system will return to factory state.
to the content
Problems after removing root
Before revoking root-rights on Android, you should carefully read all the nuances of the procedure. Problems are sometimes inevitable. In particular, crashes are quite common, expressed in spontaneous reboot of the device.
In such cases, a correction of the boot cycle is required, which is performed by means of a reset to the factory settings. This procedure is performed as follows:
- First, you need to back up applications, contacts and other user data.
- Enter the 'Recovery' mode.
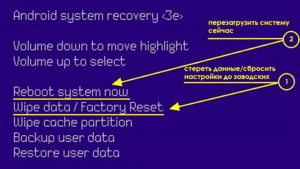
- Use the volume buttons to find the menu item 'Wipe data / Factory Reset' in the menu.
- Confirm by pressing the power button and then select 'Reboot system now'. After rebooting, the device will return to factory settings.
If this does not help, there remains one option, how to roll back root-rights to Android – flashing. If the device is already flashed, you can repeat the procedure.
to the content
