 How to connect Android to Wi-Fi with a hidden SSID, every smartphone or tablet user, as well as those who have a router, should know. SSID is the name of the router. Probably everyone has heard that you can hide your network to increase security. But then how to connect to it?
How to connect to a hidden network
Any version of this operating system provides this capability. There are corresponding parameters in the wireless connection settings, which we need to adjust. This is not difficult to do. It is only important to know the sequence of actions and to be extremely careful at the moment of data entry. So how to find hidden Wi-Fi SSID on Android?
It should be noted that this function significantly increases the level of security, since attackers simply cannot see the available connection. This means that there will not even be hacking attempts.
So, first of all, in order to connect hidden Wi-Fi to Android, you should know the name of the access point.
If this is your personal network, then this is no problem. In any case, even if in doubt, you can connect to the router using a cable, enter the control menu and see its name, security password, and any other information.
We need to know the following data, which must be specified when manually setting to Android:
- The name of the router.
- Security key (if set in the router settings).
- The type of data encryption (if the connection is secure).
Without knowing this data, you will not be able to connect. So, let's take a closer look at the connection process. The information will need to be specified in the Wi-Fi settings on your tablet or phone.
to the content
Connecting Android to Wi-Fi with hidden SSID: Video
to the content
Connecting to a hidden access point
First, enter the Wi-Fi configuration on your smartphone. Turn on the wireless module. The system starts searching for access points.

But since our connection is hidden, the SSID is not broadcast on Android. This means that this data will need to be entered manually. To do this, we perform the following actions:
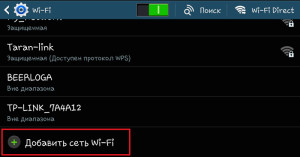
- Scroll to the very bottom of the list and click on the 'Add Wi-Fi' button. In the first line 'SSID network' you need to specify the network name for the Android device. It must exactly match what is specified in the router configuration.
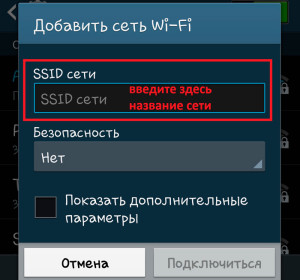
- The second step is to choose the type of data encryption. In the 'Security' item, select the type that is specified in the router configuration. Typically, this is WPA-PSKWPA2-PSK, but there are other options. It is important to know exactly what type is set in the configuration of the access point.
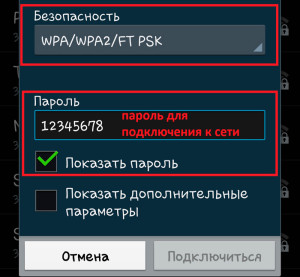
- After you select the type of information encryption, another line will appear in which you must enter the key. Enter it and click the 'Connect' button.
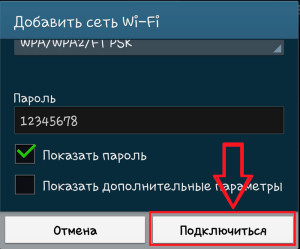
The device then connects to the router. It should be noted that the second and third points are needed only if the wireless connection is protected in the router configuration.
Sometimes more detailed customization is required. To do this, after entering the key, check the box 'Show additional parameters'. Two additional lines will appear. In the 'IP Settings' section, select 'Static' instead of DHCP. This will open the manual settings. In this case, you will have to manually enter the IP address and other information to connect to the router.
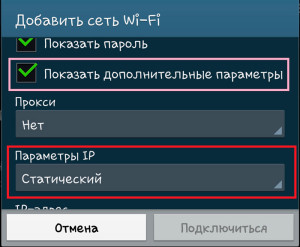
As you can see, everything is very simple. Even a beginner can handle this task. The main thing is to be extremely careful at the moment of data entry in order to avoid mistakes. After all, even the slightest inaccuracy will nullify all efforts.
to the content
