 Wi-Fi network settings on Android – and nowadays these are the most common smartphones and tablets – every user of such devices should know. There are two types of settings:
- Manual.
- Automatic.
Depending on the situation, you can choose the option yourself. So let's take a closer look at both options.
Automatic Wi-Fi network configuration to Android
In the vast majority of cases, users use automatic configuration. This means that the smartphone is initially configured and ready to connect. You just have to enter the Wi-Fi settings on the phone Android and turn on the wireless module.
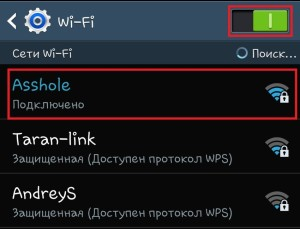
After that, the system will start searching for available connections and give you a list. Select the desired name and connect to it. If a password is required, enter it. This connection is established.
Advanced Wi-Fi settings may be required in special cases:
- If DHCP is disabled in the AP configuration.
- The network you want to connect to is hidden.
In any case, you will have to manually configure your device. How to do it? Everything is easy enough.
to the content
Manual Wi-Fi setup to Android
To get started, go to the Wi-Fi wireless network settings on your smartphone and turn on the adapter. After the list of available connections appears, you have two options:
- If you need to change the configuration of an existing network due to changes in the settings of the access point, then simply select the desired name and hold your finger on it until an additional menu appears. Here select 'Change Network Configuration'.

- If you want to connect to a new connection, then scroll to the bottom of the list and click the 'Add new network' button.
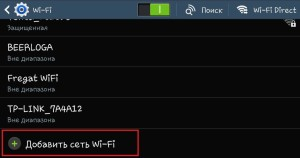
Further actions will be exactly the same for both options. The only difference is that when using the second option, you need to enter the SSID.
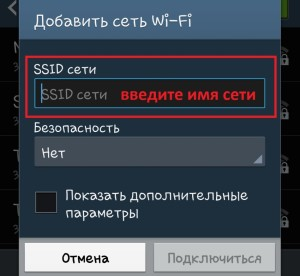
Whereas in the first option, the network name will already be known and the procedure will begin by entering the password (and if it has not changed, then the field can be left blank).

So, after you have entered the SSID and security key, and also selected the appropriate type of encryption, you should check the box next to 'Show advanced options'.

Next, in the 'IP Settings' item, select 'Static'.

This means that only the parameters you specified will be used to connect to this network. Now it remains to enter the values into the corresponding lines:
- The IP address is the address of your device. It must fall within the range specified in the access point configuration. For example, from 192.168.0.100 to 192.168.0.199. In other words, you have 100 options in this span. Only the last digit (100-199) changes. The range can be wider or narrower. The address itself may differ. It all depends on the settings of the router.
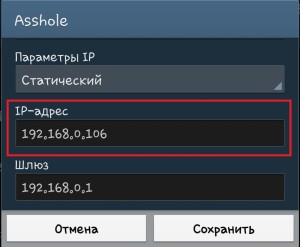
- Gateway is the main route that TCPIP uses to communicate with other hosts. In fact, it will depend on the gateway whether you can access the Internet or not. If you are setting up a connection to your access point, which is connected to the Internet, then you can find out the gateway in the instructions for it. Or it will be listed on your router. If you connect to another network, then such information should be obtained from the provider.
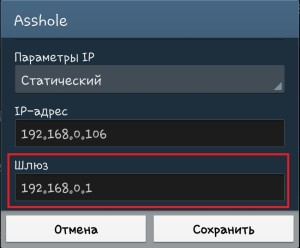
- The DNS server in Wi-Fi settings at Android is a special service that determines the literal address of domain names and maps them to a numeric IP address and vice versa. In other words, every time you enter the name of a site in the address bar of the browser, the DNS server calculates which address the specified value corresponds to, as well as which resource you need. Here you can specify two DNS – primary and secondary. If you are connecting to a router, then the DNS server will be the same as the default gateway. Otherwise, check with your provider for these values. It is worth noting that there are two public servers from Google:
- 8.8.8.8.
- 8.8.4.4.

These servers are open to everyone and work very stable. Therefore, you can specify them in the settings.
After that, save the changes you made, turn off and then turn on the Wi-Fi module and try to connect to the access point.
to the content
Setting up Wi-Fi on a tablet or smartphone with Android: Video
to the content
How to reset Wi-Fi settings
First of all, it's worth noting that you only change the configuration for a specific connection. That is, these parameters will not apply to other networks. Thus, to reset the Wi-Fi settings to Android for a specific connection, you just need to turn on the wireless module and hold your finger on the network that you want to reset. In the window that appears, select 'Forget network' or 'Change configuration'.

In the first case, the settings for this connection will be completely reset, and you will have to enter the password again (if required). In the second case, you can simply manually enable the DHCP function in the IP parameters. It will allow the device to automatically receive the desired settings.

You will not be able to restore Wi-Fi settings to Android automatically. You will have to do everything manually. But, since there is nothing difficult here, it will not take you a lot of time.
