This emulator has won the hearts of millions of users. BlueStacks creates a fully functional environment on the personal computer in which applications and games downloaded from Google Play are launched in full screen mode. The program works great on different platforms, is constantly being modified, and the latest version is released specifically for gamers. But sometimes BlueStacks lags. Let's try to figure it out.
- BlueStacks App Player Features
- Why BlueStacks is slow
- What to do
- Checking PC parameters
- Disabling unnecessary processes
- Restarting the emulator
- Installing and updating drivers
- Reinstalling the emulator
- If games slow down
- How to update Net Framework and graphics card drivers
- Transferring emulator to another drive using BSTweaker
- Improving the performance of any version of BlueStacks
- Changing the amount of RAM available to the emulator
- BlueStacks Lag? Fix: Video
BlueStacks App Player Features
The emulator provides an opportunity to use the applications created for Android on the computer.
BlueStacks is fast, multitasking, rooted, virtual memory stick, ADB, AppZone and Amazon e.
Free distribution and a Russian-language interface make the application accessible, and support for 3D games helps to increase an already huge audience of users.
The application was appreciated by fans of 'heavy' games with a cache, developers and software testers cannot do without it. The emulator is used by everyone who is interested in staying connected to the world of android applications in any situation.
to the content
Why BlueStacks is slow
The developer is constantly improving the performance of the program using experience and user feedback. Indeed, BlueStacks' optimization is paying off. With each release, the emulator becomes better, faster, more reliable and more functional, gradually getting rid of bugs, errors, etc.
However, the task of ensuring compatibility between different operating systems is not an easy task, especially since there can be an infinite number of platform configuration variations. There are problems, but they will be less if you use the latest official version available on the developer's website. Other reasons for the emulator hangs include:
- The PC does not meet the system requirements.
- Excessive OS load.
- Errors in the computer system registry.
to the content
What to do
You don't need to be a programmer or even an experienced user to fix BlueStacks. Simple steps can be taken and problems can be easily eliminated.
to the content
Checking PC parameters
First of all, you need to make sure that the PC parameters meet the system requirements. This is the simplest task, but, as practice shows, most of the problems with the emulator are hidden in this area. We often become victims of our own inattention, overlooking the requirements of the developers. But they are indicated on the site. So, it is necessary:
- Press the 'Start' button.
- Open the 'Computer' section.
- Select the 'System Properties' tab.
In the window that opens, you can view the processor parameters, the amount of RAM and the version Windows installed on the PC.
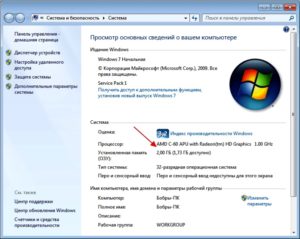
For general information on old versions of the emulator: the processor must support hardware virtualization, have a clock speed of at least 2 GHz, the amount of RAM at least 1 GB, and the OS must be at least XP SP3. It is worth considering that the requirements will depend on the version of the emulator and for BlueStacks 3 they are the maximum.
to the content
Disabling unnecessary processes
Let's move on to the question of what to do if BlueStacks is buggy. Even a large amount of RAM does not always guarantee the flawless operation of the program. Therefore, after checking the parameters, it is necessary to identify and disable processes that can overload the PC operating system. The emulator uses only the allocated amount of memory, part of which is occupied by games and applications. And among them you can easily find not the most necessary ones. This requires:
- Enter the 'Task Manager'. There are several ways, but the simplest is to right-click on the taskbar and select the corresponding item in the context menu. If the computer is frozen, Ctrl + Alt + Del works well.
- The “Performance” tab will immediately open, in which the computer boot parameters will be visible.
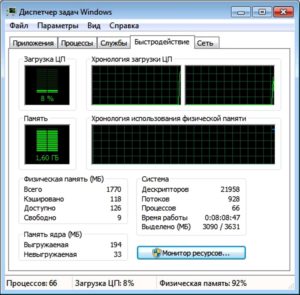
After assessing the situation, here you can disable unnecessary processes by activating the antivirus. The 'Processes' tab is simply selected, the extra process is highlighted and the 'End' button is pressed. Only you need to do this carefully so as not to harm the emulator and the PC.
to the content
Restarting the emulator
Like any other program, the emulator starts to work better after restarting. This can really speed up BlueStacks. To restart, you should:
- Close the working window of the emulator in the simplest way (cross in the upper right corner).
- Enter the 'Task Manager'.
- Find and terminate active BlueStacks processes.
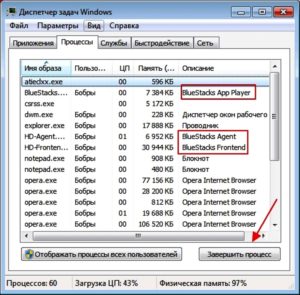
- Open the program again.
In the third version, the engine restart procedure is applicable, which is performed as follows:
- The emulator menu opens.
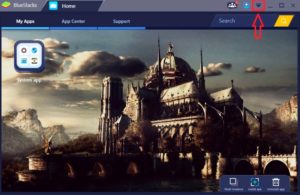
- The 'Reload engine' tab is selected.
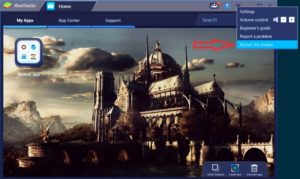
- The action is confirmed with the 'Yes' button.
By the way, you can restart your computer too. This will free up its resources and allow the emulator to run faster.
to the content
Installing and updating drivers
Old drivers, not only video cards, but everything on the computer, can cause unstable operation of the emulator. If not, the program is unlikely to work at all. Therefore, it is recommended to update the drivers regularly. And it is easy to check the status in the 'Device Manager', which can be entered from the 'Control Panel'.
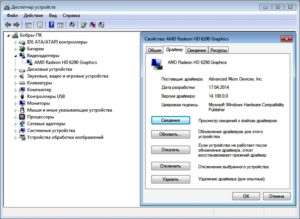
To make sure you have the latest version, you need to:
- Find the item 'Video adapters'.
- Click on the name.
- Select the 'Driver' tab. If the open window is empty, the system could not find the driver and needs to be loaded. And it is better to do this on the official website of the video adapter manufacturer.
to the content
Reinstalling the emulator
If everything is in order with the system parameters and drivers, and the restart does not work and BlueStacks hangs, you can try a radical method.
Removing and reinstalling will help eliminate non-system glitches and errors that have accumulated during use.
The removal procedure is simple, but requires correct execution. The main task in this case is not to leave traces of the old program on the computer, otherwise its components from different assemblies will conflict with each other. It is better to use an uninstaller program such as CCleaner to clean the system.
Reinstallation should be done strictly in accordance with the developer's recommendations.
to the content
If games slow down
Now what to do if games are lagging in BlueStacks. The emulator developer on his website offers the following solutions:
- Check if hardware virtualization is enabled. This can be done in B IOS or for some processors (Intel) using special software. Much depends on the OS version Windows. Detailed instructions can be found on the BlueStacks website.
- Allocate more RAM and CPU resources to the emulator. This can be done in the 'Engine Settings'.
- Keep the video card drivers up to date.
- Close other applications if PC power is insufficient.
In addition, some antiviruses (yes, probably all) slow down BlueStacks. If Avast is installed, you need to adjust its settings:
- Open the program and enter the settings.
- Select the 'Troubleshooting' tab.
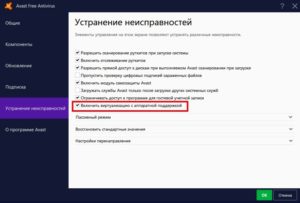
- Check the box next to 'Hardware-assisted virtualization'.
- Click the 'OK' button.
After rebooting, the problem will go away.
to the content
How to update Net Framework and graphics card drivers
Any user wants to have the most productive and functional machine. To get exactly this, Windows you have to update to the latest version bundled with the latest .NET Framework. If an OS update is not expected, the frame can be downloaded from the website Microsoft, where there is a web installer.
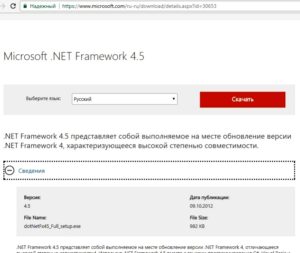
It is important to understand that the installation file must be launched on behalf of the administrator, and after installation, a computer restart is required.
It is not recommended to update drivers via BlueStacks. To do this, you need to use the usual method – downloading from the official website of the video card supplier. Typically the NVIDIA Driver Download Resources, Download Center Intel, and AMD Graphics Drivers and Software are used. The user selects the appropriate package for his card, operating system (taking into account the bitness), downloads to the PC and then 'enables' the drivers manually.
to the content
Transferring emulator to another drive using BSTweaker
By default, the emulator is installed in the root folder. When BlueStacks is running slowly, it means that there is not enough space on the C drive. In this case, the program can be transferred to another disk. The easiest way is with the BSTweaker utility, BlueStacks' universal modifier.
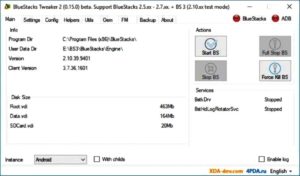
To this end, you need:
- Install BSTweaker.
- First delete and then create Data and SDCard sections in a new location, and also change the GUID.
- Start the emulator.
Before starting, it is recommended to create a copy of the C: ProgramDataBlueStacks folder. .NET Framework 4 or higher is required to run the utility.
to the content
Improving the performance of any version of BlueStacks
When BlueStacks loads the processor heavily, regardless of its version, you can raise the performance characteristics using the following manipulations:
- Changing the window size (resolution) of the emulator.
- Change the amount of RAM available to BlueStacks.
The first parameter can greatly affect the performance of the emulator. Decreasing the resolution results in faster performance and fewer errors. The task is solved in the registry editor by changing the numeric parameters of the buffer in the 'guest' directories.
to the content
Changing the amount of RAM available to the emulator
Increasing (generally changing) the amount of available RAM will be performed in the registry editor. To get there, use the regedit command. After entering you need:
- Go to: HKEY_LOCAL_MACHINESOFTWAREBlueStacksGuests Android Memory.
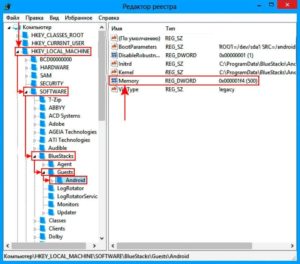
- In the window that opens, select the 'Memory' tab and check the box next to the 'Decimal' item.
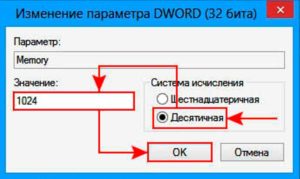
- Set in the field 'Value' the numerical value of the required RAM and press 'OK'. It makes no sense to install more than 850 MB, since the program will still not be able to use more than this volume.
After changing in 'Memory' the new parameter value will be immediately visible.
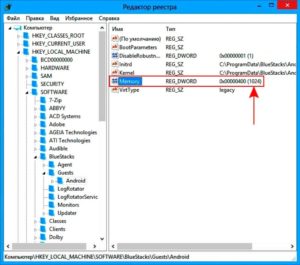
It is not recommended to use a value that exceeds half of the physical memory of the computer.
to the content
