 In this article, we'll take a look at backups, factory reset, gesture control and basic settings like date and time on your phone.
Backup
Backup allows you to save all your data, files and store them remotely on a Google server on the Internet. You can access your data from any device by logging into your Google account (even from a computer).
And then you can easily restore your data from the device or download it to a new phone at any time.
The backup includes:
- applications their data (cache),
- call log,
- contacts,
- phone / tablet settings (including Wi-Fi passwords and app permissions),
- sms messages.
You can find the backup settings here: Settings – System – Backup. To make a copy of your phone data and upload it to the Google cloud (15 GB of Google disk space is available on the free plan, the rest is for money), add a backup account.

If your smartphone is already signed in to your Google Account, just select the one you want from the list without adding a new one.
to the content
Reset
Resetting the settings is necessary if the phone starts to glitch, slow down and you catch a malware or virus. But you don't have to reset all phone settings and delete all files, you can try the following options.
- Uninstall selectively applications that you think may slow down your phone or contain a virus.
- Reset DRM licenses.
- Reset Wi-Fi, mobile internet and Bluetooth settings.
- Reset application settings, including all permissions / restrictions for them.
- Delete all data (factory reset).
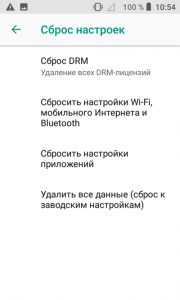
Perform a full reset only as a last resort, i.e. lose all your data! Before resetting, I recommend making a backup (read above in the article).
to the content
Gesture control
In Digma smartphones, basic models have only one gesture – Quick access to the camera.

Turn on the camera by double pressing the power button in any application.
to the content
Language and input settings
The phone language and input language (keyboard layout) are usually set when the smartphone is first turned on. But then these settings can be changed.
Go to Settings – System – Language & Input.
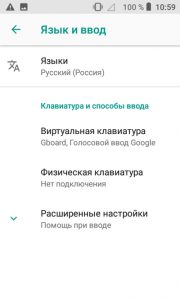
- Languages. The default is Russian. but you can add more languages from the list additionally.
- Virtual keyboard. : Gboard, Google voice input. These are standard applications, but in Play Store you can install your own keyboard and voice input from another developer. For more information on customizing the Gboard keyboard for yourself, read this article.
- Physical keyboard – connects via the microUSB port in the phone. Can be customized
- Spell Checker – check text for grammatical and punctuation errors as you type.
- Autocomplete from Google (based on suggestions from the web). Google is looking for similar user requests and offers you a quick dial. To work correctly, you need to log into your Google account.
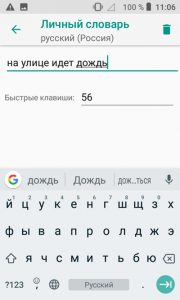
- Personal dictionary – here you can add your expressions, phrases to use them later when typing using hot keys. To add, click on the “plus” in the upper right, enter the phrase and shortcut keys.
- Pointer speed – how fast the pointer will move when typing.
- Synthesis of speech – which voice engine to use by default when typing text by voice. Read more about customization here.
to the content
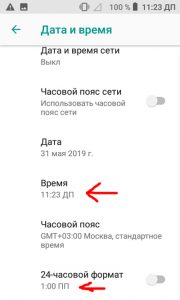
Setting the date and time
When you turn on your phone for the first time, you set the date, time zone, and local time on your phone or tablet. All options are found here: Settings – System – Date and Time.
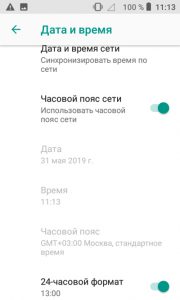
- Network date and time. Select “Synchronize Time Over Network”. Thus, even in roaming (when changing the network), the time will automatically change to local time. Either you can use the time of the GPS satellites or turn off synchronization altogether (I do not recommend it, because while traveling, you can be too smart with time zones). While this option is active, you cannot manually change the time and date.
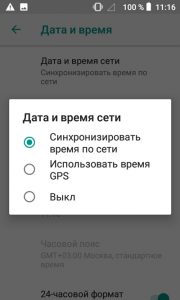
- Network time zone. Activate the setting – use the network time zone. If the option is enabled, you will not be able to manually select the time zone.
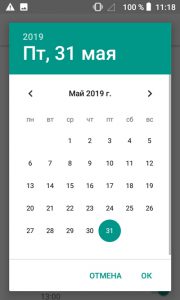
- Date – set the date according to the calendar.
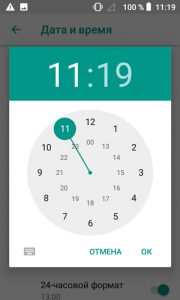
- Time – set your time.
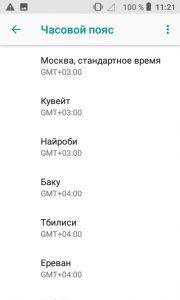
- Time Zone – select your time zone. If your city is not there, select any other with the same time offset.
- 24 hour format. In what format to display the time (12- or 24-hour format). If 12 o'clock is selected, by the time there will be a prefix PP – in the afternoon, DP – before noon.
to the content
Phone information
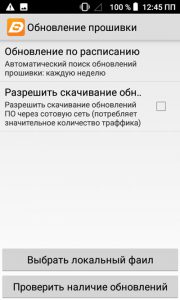
All information about the phone is collected in this section + it is possible to download and update the firmware.
- Firmware update: according to a schedule (for example, once a week), automatically or manually (by selecting a local file on the memory card). You can allow downloading updates automatically via cellular communication, but this entails a significant traffic consumption.
- General information: phone number, battery level, IMEI, IP-address, MAC-address of the wi-fi receiver, address Bluetooth, operating time since switching on.

- Device model.
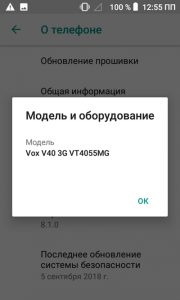
- The Android version is the current version.
- Latest security update.
- Communication module firmware.
- Kernel version.
- Build number.