The time has come! We've been waiting for this for several months and finally Google rolled out Android 11 for everyone. Now it has become truly massive and to install it you do not need to take part in any testing programs, but just download it to a supported smartphone and you can use it. Naturally, everyone who has this opportunity will want to do it as quickly as possible. I have already tried updating and was satisfied, although I used the beta version before. In this article, I will show you how to install Android 11 now. And at the same time I will give a list of models that support the installation. If your device is among them, you are led.

Android 11 is wanted by many, but now not everyone can get it.
Which phones can be installed Android 11
Among the devices on which it is possible (or will be possible) to install Android 11, there are not so few models. In addition to the second generation Google Pixel and older, they include the following smartphones:
- The entire Galaxy S10 lineup
- The entire Galaxy Note 10 line
- The entire Galaxy Note 20 line
- Entire Galaxy S20 line
- All Galaxy A range (2019/2020)
- Xiaomi Mi 9
- Xiaomi Mi 10
- Huawei P20, P30, P40
- Huawei Mate 20, Mate 30, Mate 40
- Entire line Honor 20
- All OnePlus smartphones from 6th model
- All Oppo smartphones, Realme and Vivo 2019-2020
There are other models, but at first the release of Android 11 is completely limited to Google Pixel smartphones. A little later, but as Google assures, very soon, OnePlus smartphones, Xiaomi, Oppo and Realme will receive updates. However, everything is logical. It was approximately the same last time.

The new Android is always pleasing to the eye.
The good thing about the Pixel is that it is as close to Google as possible. As a result, he not only receives updates often and for a long time, but does it first. He is also a prima regarding beta versions. All the advantages are on his side. This also happened with Android 11.
Fortunately, upgrading to Android 11 is pretty easy. The downside is that Google has not yet found a way to make these updates automatic, so the user is required to make a couple of gestures. They may take only a few seconds, but it must be done.
Basically, there are two ways to update your Google Pixel. We'll look at each of them, but the first will be the easiest and the second the hardest. I installed Android 11 on an old editorial Google Pixel 2 XL, but the procedure will be the same for other models.
How to update Android 11 over the air
Updating over the air is by far the easiest way to update any smartphone, including the Google Pixel.
To do this, you just need to open the phone settings. After that, scroll down to the “System” section (on other smartphones it may be called differently) and in the menu that opens, select “Advanced”, then open “System Update”.
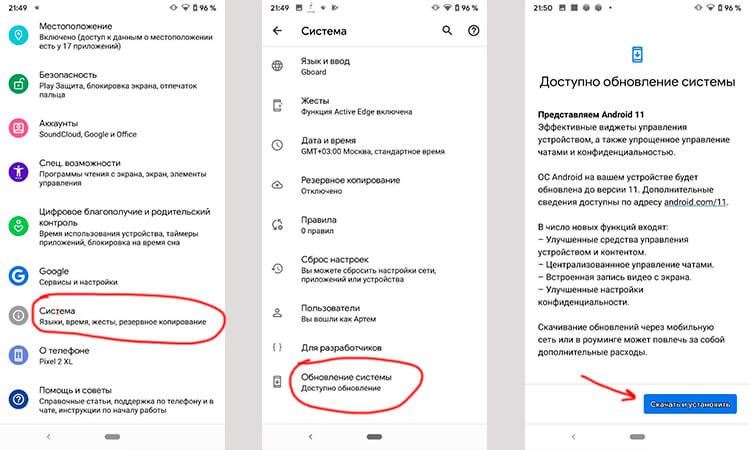
This is the easiest way to update Android.
Why didn't I receive the update Android 11
Your smartphone will now check for updates. The most interesting thing is that he may not find it. I did, but I pressed the “Check for Updates” button again and it appeared. Once again, I note that this applies only to those smartphones that, in principle, support the update.
If everything is fine, then after a second search you will be prompted to “Download and install” Android 11. That's all – then you just have to agree to the proposed actions (like a reboot). Such an easy way.
How to install Android 11 via computer
The next way to upgrade Android to version 11 is much more complicated. It should only be used if your phone is not receiving updates over the air for some reason.
You will need to download the tools zip archive to force the update. You should pay close attention to this, as there are many steps, and if you do something wrong it probably won't work.
First, you will need to download the Android SDK from the Android Developer website. Then you will need to open a command line or terminal (depending on the operating system of your computer) and run the necessary files.
Now that the SDK is installed, the next step is to enable developer settings and USB debugging. This is needed for the next steps.
To do this, first go to Settings. Then scroll down to 'System' and click 'About phone'. Then click on the “build number” field seven times. After you have done this, a dialog box appears at the bottom of the screen with the message 'You are now a developer'. Go back to the “System” section and you will see the item “Developer options”.

This enables USB debugging
Go to Developer Options, find USB Debugging and enable it. Now connect your smartphone to your computer and click 'OK' in the dialog box on your phone asking you to allow USB debugging when connected to this computer.
Use the adb devices command in the command line or in the terminal to make sure it works fine with your device. If you are told that the device is not authorized, you will still need to give permission.
Before you can do anything, you will need to unlock the bootloader. It's not difficult and you will need to turn off your phone completely. Then press and hold the power button and the volume down button. You will be taken to the bootloader menu.
Alternatively, you can use the command line to do this – type adb reboot bootloader. Now, to unlock the bootloader, you will need to use the fastboot flashing unlock command.
The phone will ask if you exactly want to unlock the bootloader, as this will reset the device. Use the volume buttons to select 'Yes' or 'No', then press the Power button to confirm your choice. Once this is done, enter fastboot reboot-bootloader.
Now it's finally time to flash this OTA. Of course, if you've done this before, you probably don't need to worry about these last two steps. And this also works without unlocking the bootloader. But to actually flash the entire factory image, you will need to unlock it.
At the command prompt or terminal window, enter adb devices to make sure your device is connected. Now we need to put the device into bootloader mode. Turn it off and then press and hold the power button and volume down button. Or enter adb reboot bootloader into the command line.

Still sure you want to install Android 11?
Now press the Volume Down button twice until you scroll down to the 'Recovery Mode' option. Then press the power button to select it. Once you do this, it will look like your phone is restarting and then the screen will display Android with a red exclamation mark above it. Hold down the power button and press the volume up button. You will now be in recovery mode.
While in recovery mode, scroll down to 'Apply update from ADB' and then press the power button to select it.
At the command line, enter adb sideload [OTA file name] .zip as the command. It is usually easier to rename the file so that it is not a random sequence of numbers and letters.
In recovery mode, you will see the status of the update downloaded to your phone. Depending on the size, the process may take several minutes to complete. But as soon as this happens, the phone will reboot and return to the normal screen Android.
This method is much more complicated than the usual over-the-air update. Therefore, I would advise checking for updates several times. If that doesn't work, wait a while and try again. As usual, such processes can lead to the fact that something goes wrong. Evaluate for yourself whether it is worth, albeit small, but the risk.